Sunday, January 7, 2018

NON-REFRIGERATED BACON FOR FOOD STORAGE? Appleton Farms Bacon REVIEW


A quick review for  Appleton farms precooked bacon. The package cost less than $3 bucks from a nearby Aldi's store. 


Comparing these ingredients from a package of refrigerated bacon (another brand) from my fridge, they are identical!


Huge bonus - long shelf life and no refrigeration needed. To be honest, if the shelf life was less than a month, I wouldn't have been interested in this product.  


2 layers of bacon on wax paper, with 6 slices per section. 


These are precooked, but we wanted to pan fry (heat up) to test the amount of fat (for frying eggs) and to compare with raw pan fried bacon. 

For taste and texture, from 1-10 this bacon is a 7 or 8 and we (self and spouse) would purchase this again for our food storage. This bacon is similar in taste/texture to restaurant dining - thin and crisp.

Due to the success of this pre-cooked bacon, I plan to keep an eye out for other brands that don't require refrigeration.

We've started a tradition whenever we fry bacon in our home -- 3 pairs of hungry eyes wait in anticipation, so our dogs enjoy bacon each time we dine, and for this review, no exceptions were made! 

copy to Pinterest

Friday, January 5, 2018

5 BENEFITS for using a bread machine - Oster REVIEW


This review is for those (like me) who don't have a need for another space-hogging-kitchen-gadget.

So after hearing my mother/sister rave about their bread machines and the fact that they were out baking me by ten to one... 

I broke down and purchased the Oster - 2lb EXPRESSBAKE BREADMAKER  (due to my mother's recommendation, as she had owned several brands) 


The top 5 benefits I've discovered: 


1.) JUST ADD INGREDIENTS - No bowl needed - no mixing - plop pan into machine and press buttons. So easy your kids could bake!

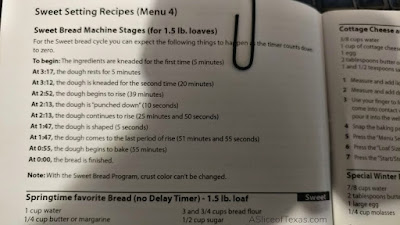
2.) NO BABYSITTING -  After pressing buttons, linger just long enough to ensure dough is mixing/consistent, then allow machine to do the timed intervals of allowing dough to rise and bake! The booklet that comes with your machine gives a glimpse into the timed stages for each process. 


3.) NO OVEN NEEDED - During the summer, cooking from the machine is a breeze as this doesn't heat up the house. Not to mention, a safety feature if you want to press the button and leave the home for the day (this machine has a 13 hour delayed timer) Return to some fresh baked bread! 


4.) TIME SAVER -  We could save money by doing things the old fashioned way, but isn't time more valuable than money? Not to mention, how many times have you skipped baking bread because you were just plain tired or short on time? 

Ingredients from the store...  

5.) NO PRESERVATIVES - And of course, how can one dispute  the health benefits of fresh homemade bread with minimal ingredients? Not to mention, if you're on a restricted diet, you can save money by making your own gluten, or sugar free loaves. 


                                             ~~~

I am thrilled with my new Oster bread machine. My only recommendation if you are contemplating on buying one is that this machine needs to be placed on a counter or table where it cannot move. If the surface is slippery, the machine could move while in the mixing process. I now place mine on a non-skid surface, or block with an object. I am speaking from experience! With my first machine, I left the kitchen to hear a crash 5 mintues later. My machine was across the kitchen floor, dough lying in a heap in front of my guilty looking dog. The cord yanked from the wall, as it had tumbled off the counter. Believe it or not, it still worked, but the heating element was off by a bit. 

Amazon replaced my machine free of charge, so this is my second machine. 


Thursday, January 4, 2018

MOM'S WHEAT BREAD - The Best Bread Machine Recipe

If you like oatmeal and wheat, you will LOVE this bread. This recipe was passed down from my mother and is one of our family favorites. 


Oat Bread Recipe for Bread Machine  


9 Ingrdients
oats
butter 
water
brown sugar
salt
wheat flour
all purpose flour
yeast
gluten 


Place in  bread machine in exact order:

1/2 cup rolled oats
1 tablespoon butter
Pour 1 1/4 cups of boiling water over it, stir, and let sit till warm ~~~~~

Then add the rest of the ingredients in this order:

1/4 cup brown sugar
1/2 tablespoon salt
3/4 cup whole wheat flour
1 3/4 cup all purpose flour
1/2 tablespoon yeast
1 teaspoon gluten

Set machine to 1.5 lb loaf and crust color to medium... then press start

Keep an eye on the dough as it kneads, using a rubber spatula if needed to scrape down sides... when you see the dough has come together completely, using inex finger and thumb gently pinch the dough to see if it's too dry or sticky... 

If sticky add about a tablespoon of flour and let knead in, then recheck, continuing to add flour as needed. 

If dough is too dry then slowly add a very tiny bit of water and keep checking till dough is good. Then you can allow the machine to do its job from that point on. 


****Exact measurements are very important..   but also keep in mind that things like humidity in the summer can cause a sticky dough and a dry winter house can make a dry dough, forcing you to add water.. that's why it's important to check the dough texture while going through the first kneading.. it only takes a few minutes but is worth it in the end. 

Also, the gluten part is kind of necessary since the oats are gluten free and all purpose flour is lower in gluten then bread flour..  Gluten is added to the recipe to help the bread rise higher and be more tender...   If you want to try this recipe without the gluten and it turns out, give us a hollar as we'd love to hear back!   


Not only is the bread delicious, but we love the texture! 
copy and save to Pinterest